Thursday, September 29, 2011

hat

IMG_4216.jpg
As a general rule I don't let the kids choose their own clothes.  Left to their own devices they'd probably end up looking like a crazy homeless person and a transvestite hooker in various states of undress.  Until the answer to every fashion question is no longer 'hot pink sparkles', I have appointed myself as stylist.  But just to give the kids a little freedom of expression I occasionally break my own rule and let them pick something out.  This hat was one such concession.  The weather is warming up and both the kids were in need of a new hat.  I let Minty look through my fabric stash and she chose this pink Alexander Henry 'dear zoo' print.  It's quite loud and honestly I'd never intended to use it for a garment (I had it earmarked for a library bag or a backpack) but I think the end result is pretty cute.  And if it means there are going to be fewer arguments over being sun smart I think we'll all be happy!  The hat is reversible, but I don't actually have any photos of the other side.  It's a more subtle pink and white stripe, so it should fit the bill when more sedate head wear is required.  The pattern is from Liesl Gibson's Little Things to Sew.

IMG_4204.jpgIMG_4202.jpg
IMG_4210.jpgIMG_4209.jpg

Tuesday, September 27, 2011

In which Danny comes to breakfast...

My kids are wretched first thing in the morning.  Low blood sugar prior to breakfast inevitably leads to some combination of sobbing, whining and brawling, with flash points caused by disputes over who will or will not get honey drizzled on their porridge, and who will get to sit on the much coveted pink chair.  The usual scene at breakfast time, involves the two kids jostling at the  child gate to the kitchen, both chanting 'I want pink' with increasing hostility, whilst I hurriedly try to make the porridge before someone comes to blows or bites someones ear off.  By the time the breakfast is ready it is not uncommon for one or both children to be so overcome with grief that they are unable to eat a single bite.  On the very worst mornings, my solution is to invite Danny Kaye (via youTube) to breakfast.  There really isn't much Danny can't fix.  I defy anyone to start the morning with 'the best things happen while you're dancing' and not feel energised and ready to face just about anything.  Other firm favourites include the songs from Hans Christian Anderson (particularly the ugly duckling), everything is tickety-boo and of course lullaby in ragtime.  By the time breakfast is over Turi is usually tapping around the lounge swinging his best broadway arms!

Monday, September 26, 2011

house update


I've been taking a bit of a blog nap.  Although stacks has been going on around these parts, I have writers block and can't seem to commit fingers to the keyboard.  Things have been rather hectic the last couple of weeks with the Mr spending long hours on site, while I take on a virtual solo parenting role.

To give you a bit of a house update, after a lot of drama our power has finally been connected on site and our solar panels have been installed, (just in the nick of time for us to receive the grant!)  Since we don't have a house to put them on yet, they had to be ground mounted (you can see the structure behind Turi in the photo on the right).  We've also had the site excavated, ready to start digging the stumps this week.

I'm going to try and push through my writing funk and post a bit more this week, but for now I'm off the take the kids to the swimming pool and try and make the most of this glorious day.

Thursday, September 15, 2011

Bean bag games


OK so I'm not really comfortable calling this a sewing project since the sewing involved was minimal and basic at best but I'm going to share this anyway since it's all I've achieved this week.  

Minty seems to have boundless energy at the moment and for those times when it's impractical to take her out (too wet, too hot, Turi's naptime) I've been trying to come up with some indoor games that channel this energy for good rather than evil.  I was talking to my mum about it and she reminded me of those little bean bags that kids use in primary school for physical development class.  So I decided to make some of my own.  Mine are 5inch squares, sewn from vintage sheets and fabric scraps I had in my stash.  Minty helped pin up the squares and when I had whipped around the edges on the machine she filled them up with lentils from a bowl using a teaspoon (is it just me or does spooning lentils sound like something those Montessori folk would get up to?).  

Now I know these little bean bags don't look like much but there are hundreds of different games you can play with them if you use a little imagination.  To get you started here are a few ideas (found here, here and here):

  • throw beanbag in the air and catch it (to make it harder turn around while it is in the air)
  • throw beanbag up and backwards over your head and try and catch it behind your back
  • throw beanbag in air, clap your hands once and catch it
  • throw beanbag in air and clap your hands under your right leg before catching it again.  Then try with the other leg.
  • throw beanbag up, jump, then try to catch it.  Try jumping twice, then three times.
  • throw it up, kneel down and try and catch it.
  • throw and catch with just your right hand, then just your left.
  • balance the beanbag on your foot, then throw it up and catch it from there.  Try with the other foot.
  • Throw the bean bag in the air and try and catch it on your foot.
  • Try running with the beanbag balanced on your head.  Now try jumping.  Kneel down and stand up again or sit down.  Try climbing the stairs.  Try doing these with two, then three beanbags balanced on your head.
  • Now try walking, running, jumping etc with the beanbag balanced on your shoulder.
  • Play catch with the beanbags.
  • Set up hoops, buckets, or boxes (maybe the laundry basket!) and try throwing the beanbags in from a distance.  You can allocate harder targets more points to make the game more complicated.
  • play tic tac toe by drawing up a grid with masking tape on the floor, or chalk outside and then throw the beanbags in the squares to try and get three in a row.
  • Stand up some paper towel tubes on the floor and toss the beanbags at them to try and knock them down.
  • Set up some coloured cardboard shapes on the floor and ask the kids to throw a beanbag into a specific shape or colour.  Or try and throw a specific number of bean bags on a particular shape.
  • Set up a pretend pond with lilly pads made from cardboard or cloths on the floor.  Use some stuffed toys to be crocodiles.  Give each kid three beanbags (frogs) and ask them to try and throw their frog onto a lilly pad.  The winner is whoever keeps the most frogs safe from the crocodiles by landing them on the lily pads.


So far Minty has played lots of balancing and catch games.  Turi on the other hand is only interested in using the bean bags as pillows and mattresses for his toys!!

Tuesday, September 13, 2011

Conversations with Minty...


Minty: Did you know that a zebra with black and orange stripes is a tiger?


Monday, September 12, 2011

In which we eat our words...


sandletters
Minty has recently become interested in learning her letters.  Now I know some parents out there are hard core Steiner converts and don't believe in teaching kids to write until they are 6 years old.  If you fall into this camp you will probably think I am cramping my child's creative spirit and hindering her ability to enjoy childhood.  At the other end of the spectrum there are those parents whose children came out of the womb holding a pencil in a pincer grasp and are well on the way to writing their first novel by age 3.  These parents will probably be shocked that Minty still can't write her own name.  

This post isn't intended as some kind of educational manifesto.  At the moment I'm just following the kids interests and trying to keep everything light hearted and fun.  With this in mind I'm going to share with you a few games we've been playing and things we've been doing to help Minty take the very first steps toward literacy.  

So as not to overwhelm Minty, I'm just showing her the letters in her name and Turi's name to start off with.  When she's got these down we'll move on if she's still interested.

One of the activities we've done is to make sand letters.  I found the idea here.  Basically you just write each letter on a card with some glue and let your child tip sand on it.  Shake off the excess sand and leave it to dry.  Minty uses the cards to trace over the letter with her finger.  The textural nature of these apparently help kids to remember the shape of the letter when they are learning to write.

Another game we're playing is a sort of letter scramble game.  I've written all the letters to Turi and Minty's names on bits of paper.  I mix them all up on the floor and then Minty tries to peg them up on the clothes horse in order to spell out the names.  

In another attempt to encourage letter recognition we made alphabet cookies today.  I used this recipe.  This activity encouraged a lot of dialogue about the different letters.  Talking about their shapes and which letter we were cutting out of the dough.  When Minty asks for a cookie, I try to ask her which letter she would like from a selection of two ('would you like this letter M or this letter T?') I also like to think there is an element of maths to this activity, while the kids frantically try to work out which letter has the greatest surface area so that they can choose the biggest cookie!


alphabetcookies
Since I know you are all such a creative bunch, do you have any more fun ideas for learning the alphabet?

Thursday, September 8, 2011

Go fish!

IMG_3900.jpg
IMG_3897.jpgIMG_3908.jpg
IMG_3906.jpgIMG_3899.jpg
I don't think I'm alone in thinking gifts for boys are hard… and even harder when you're trying to come up with something hand made.  So I'm excited to share my latest sewing project with you.  It's a magnetic fishing game I made for one of Minty's little friends who just turned four.  He loves going fishing with his dad and has a boat made out of cardboard boxes permanently set up in their lounge room so I had a feeling this would be perfect for him.  I'm pretty sure I was right!  He seemed genuinely excited with his gift and even stopped mid-party to give it a try.  Minty loved it too and was pretty reluctant to give it away!

The fish are fairly simple, primitive designs.  I just sketched the patterns free-hand but if you wanted to make these yourself and felt nervous I'm sure you'd be able to find some fish templates if you googled around.  I used fabric from my stash - some Heather Ross mendocino, Joelle Hoverson cake rock beach and some other solids and linen I had lying around.  Each fish has a small washer stitched to it's nose.  Originally I was planning on sewing these inside but with all the stuffing and fabric the magnet wasn't strong enough to pick them up.  The rod is made with a dowel and string.  The magnet is glued to the end of the string as the magnet was too hard to drill through.  I also made a simple drawstring bag to store the fish in (don't you just love little drawstring bags for storing little toys?!)
IMG_3893.jpgIMG_3904.jpg

Wednesday, September 7, 2011

Conversations with Minty...

IMG_3765.jpgIMG_3746.jpg
IMG_3761.jpgIMG_3762.jpg
IMG_3752.jpgIMG_3770.jpg
Me: I'm getting really fed up with you today.
Minty [exasperated]: me too because you keep shouting at me!

Tuesday, September 6, 2011

Kids' stuff...

IMG_4105.jpg
IMG_4116.jpg
IMG_4021.jpg
IMG_4081.jpg
Bubble wands and watercolours… what's not to love?
IMG_4089.jpg

Monday, September 5, 2011

In which I make a bombe...


bombe alaska
We've had a bit of a crazy weekend this week celebrating a kids party, a wedding, father's day and my father-in-law's 60th birthday.  With so many lovely things it's hard to know what to blog about, so I'm just going to skip straight to one of my favourite things about a celebration and that is baking cake (of course)!

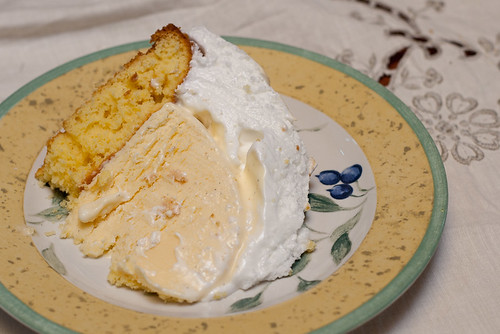
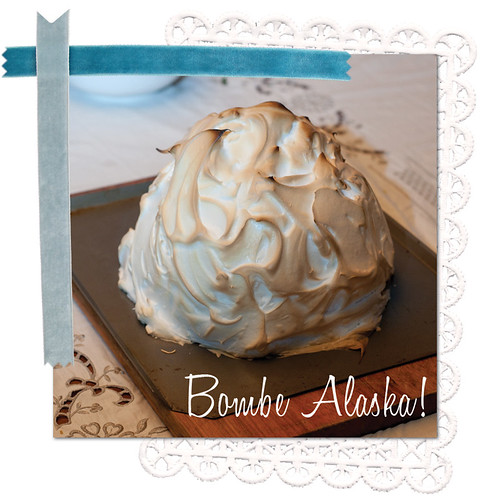
My father-in-law's two favourite cakes of all time are Prinsesstarta (Swedish princess cake) and Bombe Alaska.  Since I hadn't ever eaten Prinsesstarta before I thought I'd have more hope of success making a Bombe Alaska.  For the uninitiated a bombe alaska has a sponge base, with a mound of ice-cream in the centre, all covered with mountainous pillowy clouds of meringue.  It is a bit of a leap of faith baking ice-cream in the oven but the meringue acts like an insulating blanket and stops it from melting.

The cake was a big hit.  I think it might be my new favourite - for it's theatricality and unbeatable kitsch.  I'm looking forward to experimenting with different flavours next time.  If you'd like to make your own here is how you do it...

If you're feeling lazy you can buy a tub of ice-cream but really I think it is well worth making your own.

Vanilla ice-cream (recipe from David Lebovitz's The Perfect Scoop - aka the best ice-cream book ever!)
250ml whole milk
150g sugar
500ml heavy cream
pinch of salt
1 vanilla bean, split in half lengthwise (I really recommend buying a good quality vanilla bean not just those crappy rock hard ones you can buy in a packet at the supermarket.  It makes a big difference and if you are going to all the trouble of making your own ice-cream you want it to be amazing)
6 large egg yolks
3/4 teaspoon vanilla extract

Warm the milk, sugar, 250ml of the cream, and salt in a medium saucepan.  Scrape the seeds from the vanilla bean into the warm milk and add the bean as well.  Cover and remove from the heat and let steep at room temperature for 30mins.
Pour the remaining 250ml cream into a large bowl and set a mesh strainer on top.  In a separate medium bowl, whisk together the egg yolks.  Slowly pour the warm mixture into the egg yolks, whisking constantly, the scrape the warmed egg yolks back into the saucepan.
Stir the mixture constantly over medium heat, with a heat proof spatula, scraping the bottom as you stir, until the mixture thickens and coats the spatula.  Pour the custard through the strainer and stir it into the cream.  Put the vanilla bean into the custard, add the vanilla extract and stir until cool over an ice bath.
Chill the mixture thoroughly in the refrigerator (overnight).  Remove the vanilla bean and churn in your ice-cream maker according to the instructions.

Line a small bowl (pudding shaped is best - I used one that was about 61/2inch diameter.  You need the diameter to be about 2inches smaller than the diameter of your cake tin) with glad wrap.  Fill bowl with ice-cream, cover and freeze.  When it comes time to assemble the bombe sit the bowl in hot water for a few seconds and the ice-cream should tip out fairly easily.  Pop the glad wrap covered ice-cream back in the freezer to harden up for a few minutes before assembling the cake.


Sponge Base (recipe from Nigella Lawson's Feast - I've tweaked the method a little)
100g butter
6 egg yolks
100g caster sugar
100g plain flour
25g cornflour
1 teaspoon baking powder
1 teaspoon vanilla extract
finely grated zest 1 lemon

Preheat the oven to 200C.  Butter and line a 25cm (I used a 21cm) springform tin with baking paper.
Cream the butter and sugar in an electric mixer.  Then beat in the egg yolks, then the vanilla and zest and finally the dry ingredients.
Spread into the prepared tin and bake for 12-15mins until a cake tester comes out clean.  Allow to cool completely.
You can make this in advance and put it in the freezer (thaw for 2 hours at room temperature before assembling the cake).

Meringue and putting it all together (recipe from Nigella Lawson's Feast - again I've tweaked the method a little)
6 egg whites
1/4 teaspoon salt
1 teaspoon cream of tartar
200g caster sugar

Preheat the oven to 220C and put the shelf down low.
Whisk the egg whites until they are foamy and then add the salt and cream of tartar and then continue whisking until soft peaks form.  Gradually add the sugar, beating well after each addition by which time you should have a thick and glossy meringue mixture.

Place the cake base on a baking tray.  Unmould the ice-cream onto the base (see notes under ice-cream) or if you are using a bought tub scoop softened ice-cream into a mound on the cake making sure you leave an edge of sponge around the outside.

Pile the meringue over the top of the ice-cream and completely cover the sponge top and sides, creating a mountainous swirly effect.  Make sure no ice-cream is showing through as it will melt in the oven if not protected by the meringue.
Put it into the oven for up to 10 minutes until it has turned golden in colour - keep an eye on it!  Eat immediately!

IMG_4009.jpg

I missed out on seeing my dad on father's day so I just wanted to give him a bit of a shout out here.  Thanks for being all around generally awesome - those times you cleaned out my car and filled out my tax return didn't go unnoticed!!!